Klinker fixing
Preparation before tiling
The necessary tools for the installation of natural clinker are the bucket of water, notched floor trowel, rubber trowel, sponge, spacers, levels, pencil, blade, brush, spatula and rubber mallet.
The substrate to be tiled must be compact, even, level and structurally sound. Compensate if necessary with the bonding material. It is recommended to waterproof wet areas or make a gentle slope for water drainage. In any case, a minimum slope of 2% should be done in outdoor areas of more than 25 sqm.
Prior to the tile installation the content of several boxes of different pallets should be mixed in order to achieve the subtle differences in shading, a characteristic feature of natural klinker. In the case of special designs, a prior setting out is recommended.
Bonding material
The bonding material will vary according to the climate of the region where the tiles are laid :
- Cement-based adhesive C2 is the usual bonding material,
- In regions with severe climate, type C2E is recommended,
- In extreme conditions when higher flexibility is needed, C2S1 or C2S2 types are the most suitable adhesives.
Apply the bonding material with a notched trowel leaving no void so that the tiles rest completely on the bonding material. To ensure there is no void, the buttering-floating technique should be used (buttering with adhesive both the tiles and the substrate ensure full contact between both materials).
Klinker fixing
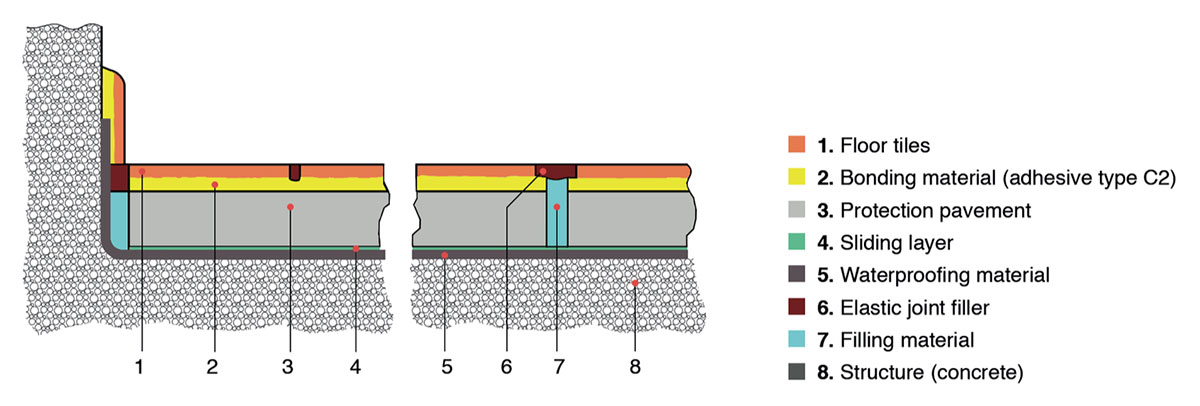
We recommend following the building standards in force and the steps indicated in the diagram:

Spacers should be placed between the tiles to make easier a careful fixing ; then tamp them with a rubber mallet. All the tiles should be laid with the same grooving orientation.
The control joints should be 3 to 5 mm wide for small and medium formats (less than 33×33 cm) and between 5 and 7 mm for large formats (33×33 cm and bigger).
For interior installation, we recommend Terraklinker Interior and / or reduce the joint in 1 or 2 mm.
The expansion/movement joints should be applied every 20/25 sqm outdoors and every 50/70 sqm indoors. In walk ways, a partition joint should be applied every 4 or 5 ml. The joint should be minimum 10 mm thick.
If skirtings are to be fixed, a hidden perimeter joint should be left behind them (min. 10 mm).
The perimeter and structural joints should be respected; they should be 10 to 15 mm thick and they should be filled with an elastomeric sealant that imitates the color of the tiles.
Once the bonding material is dry, the grooves between the pieces should be carefully cleaned in order to leave them without any residue or laitance that would hinder the installation and the setting of the joint material.
The sealant should have the optimum fluidity to make easier its penetration into the joints. It should be spread with a spatula or a rubber trowel, filling the joints diagonally. In any case it is highly recommended to follow the instructions of the sealant manufacturers.
To achieve a complete filling of the joints, it is advisable to fill them thoroughly before the mortar begins to set.
Excessive adhesive should be removed with a damp cloth before the material has set, nevertheless water should not permeate the joints. The tiled surface should be cleaned washing the sponge several times in clear water. Three hours later another cleaning should be done in the same way.
If you need further information on natural klinker installation in areas with severe climates, we suggest that you consult our technical data sheet on frost-resistant klinker fixing.
End of work
The best cleaning consists of avoiding dirtying too much during the tiling process. We recommend not delaying cleaning after fixing the tiles to prevent cement and sealant residues from drying out and making an optimal finish difficult.
Even so a thorough cleaning after installation is essential. The joints should be previously saturated with water, then a descaler diluted in water should be applied for 15 minutes and rubbed with a stiff bristle brush. Finally the tiled surface should be rinsed with water or a high pressure water jet.
For daily cleaning, the use of bleach is recommended. Taking into account the low surface porosity of our tiles, any stain can be easily removed using the appropriate detergent or solvent.
For further information on cleaning and maintenance, we advise you to consult our technical data sheet on the guidelines for cleaning and maintenance of klinker.